GForce SAAS Documentation
Thank you for purchasing this application. If you have questions that are beyond the scope of this help file, contact us.
Before you begin installation, make sure you have a webserver that meets the following requirements:
- PHP >= 7.1.3
- MySQL >= MySQL 5.7
- BCMath PHP Extension
- Ctype PHP Extension
- JSON PHP Extension
- Mbstring PHP Extension
- OpenSSL PHP Extension
- PDO PHP Extension
- Tokenizer PHP Extension
- XML PHP Extension
GForce was built using Laravel 5.8
-
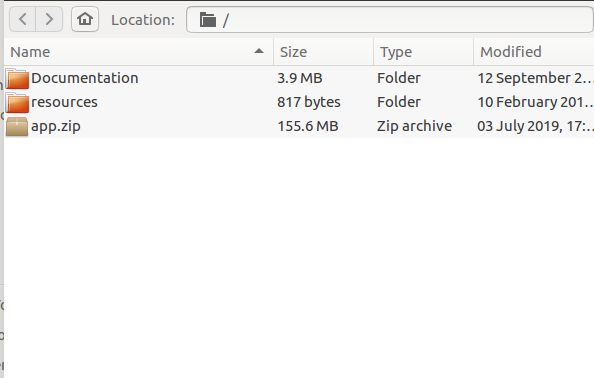
The GForce installation file consists of a zip file that as the following contents when unzipped
-
Upload the app.zip file into the root of your web server or wherever you would like the application to reside.
-
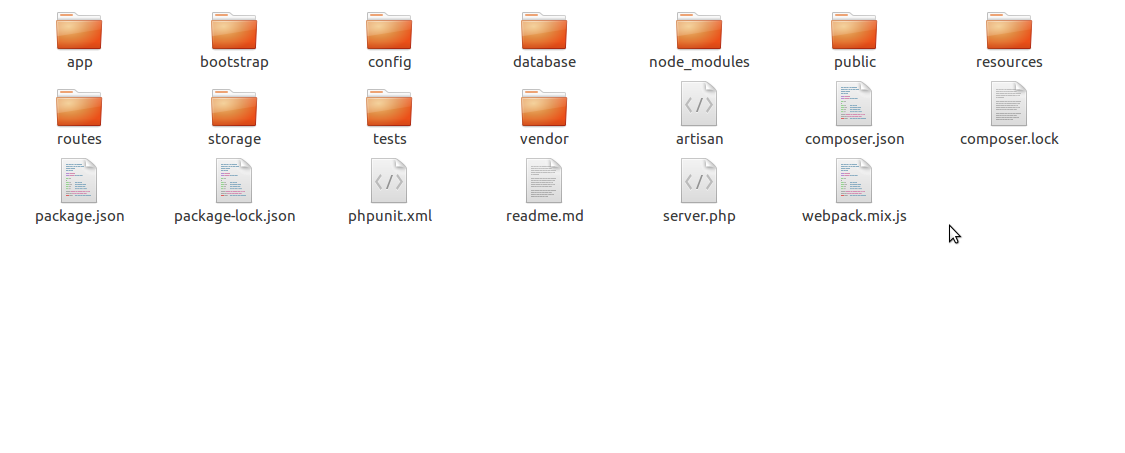
Extract the contents of the app.zip folder. You will see the following directory structure:
- We recommend that you point your domain name to the public directory. Your should be able to do this from your hosting's control panel.
Otherwise, you can use the .htaccess file located the the 'Resources' directory (this file might be hidden depending on your operating system. Make sure you enable display of hidden files for that directory). Simply upload this file to the same directory as the public folder and then change the [YOUR_DOMAIN_NAME] placeholder to your actual domain name
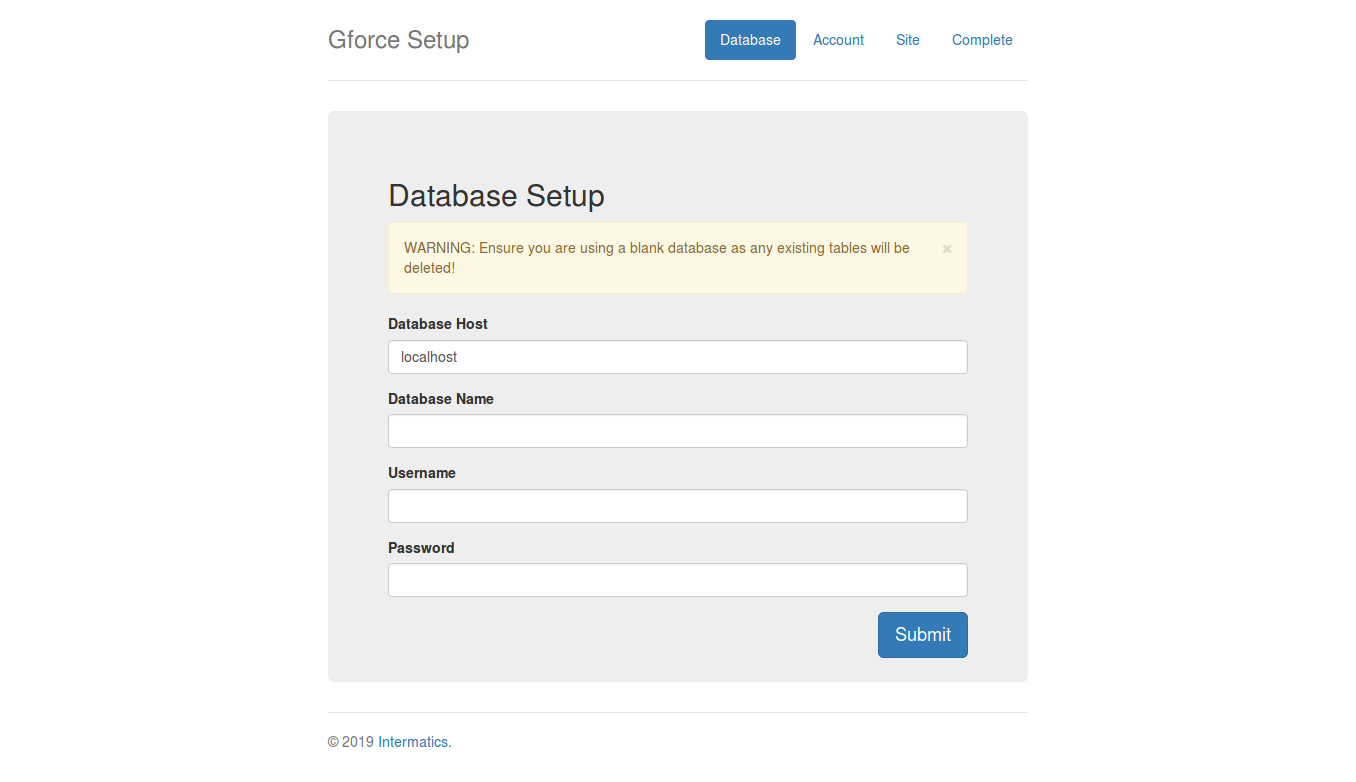
- Open your web browser and enter the domain name for the application. You should see the setup wizard open like below:
-
Enter in your database credentials. Please ensure that the database already exists and
that it is empty. The installation may fail if similar tables exist in the database.
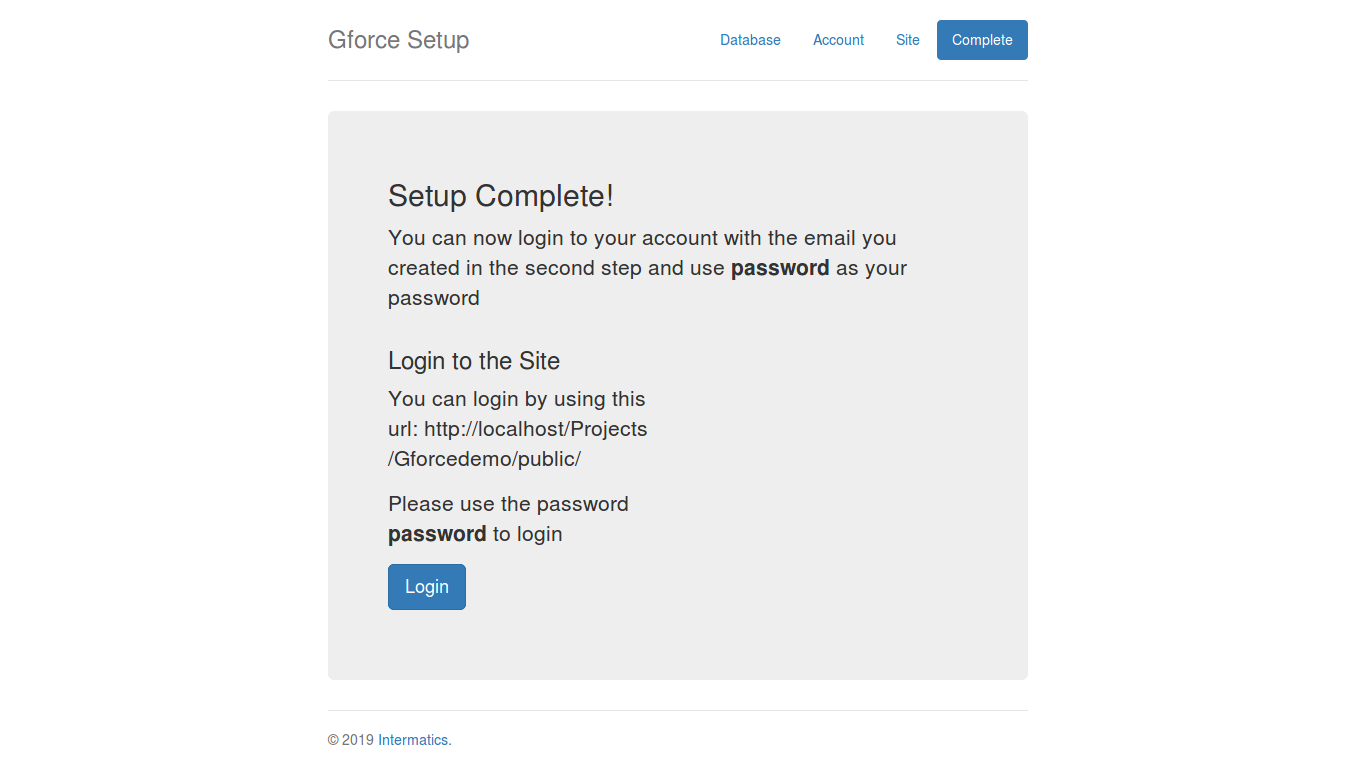
Once you complete the setup wizard, you will reach a page that will give you the link to your GForce site. You will also receive
an email with your admin account login credentials. Please use the password password and your selected email to login.
If you follow the link to the main site, you should see a screen like below:

This is the home page.
Subdomain Setup (Tenant Urls)
Gforce will automatically create a new url (subdomain) for each Tenant (subscriber). This url is a combination of the username they choose (which must be unique in the system) and the main (base) domain name you pointed above.
In order for the subscriber url to work, you will need to create a wildcard subdomain that points to the same public directory as your main domain above. Make sure your host supports this feature.
(a wildcard subdomain is usually in the form of *yourdomain.com)
Database usage settings
The application can be setup to use a single MySQL database or multiple databases.
The default usage is to use a single database (the 'prefix' mode). This setting is compatible with all hosts as long as you grant all permissions to the user especially CREATE TABLES.
In this mode, all new tenants will have new tables created for them in main database starting with a prefix. The prefix will correspond to their website ID.
If you server allows your database user to create additional databases, you can change the configuration to use multiple database. To do so, open the .env file in the root directory.
Check for the line that starts with TENANCY_DATABASE_DIVISION_MODE. Change its value from 'prefix' to 'database'
The application comes with 2 roles. They are:
- Administrator
- Subscribers
Administrators have access to a separate Admin section where they can control the entire application. Subscribers are the tenants that signup to purchase plans
All GForce users (both admins and subscribers) use the same login form. Login by clicking the 'Login' link at the top menu
Once you login with your first Admin account, you will be directed to the admin section. You should see the following screen:
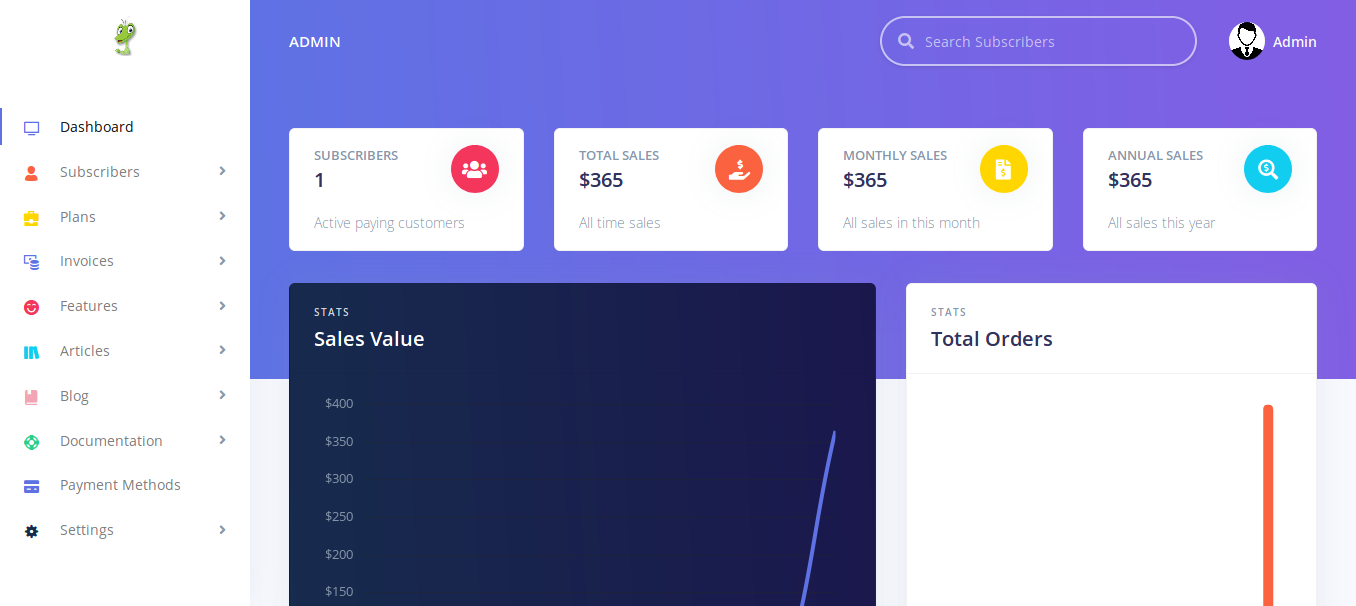
In this section, you can setup the structure and options of the application. You can also manage all users and administrators here.
The member section is where subscribers can view details about their subscription and pay for invoices. Once a subscriber logs in, they will see the
following dashboard:
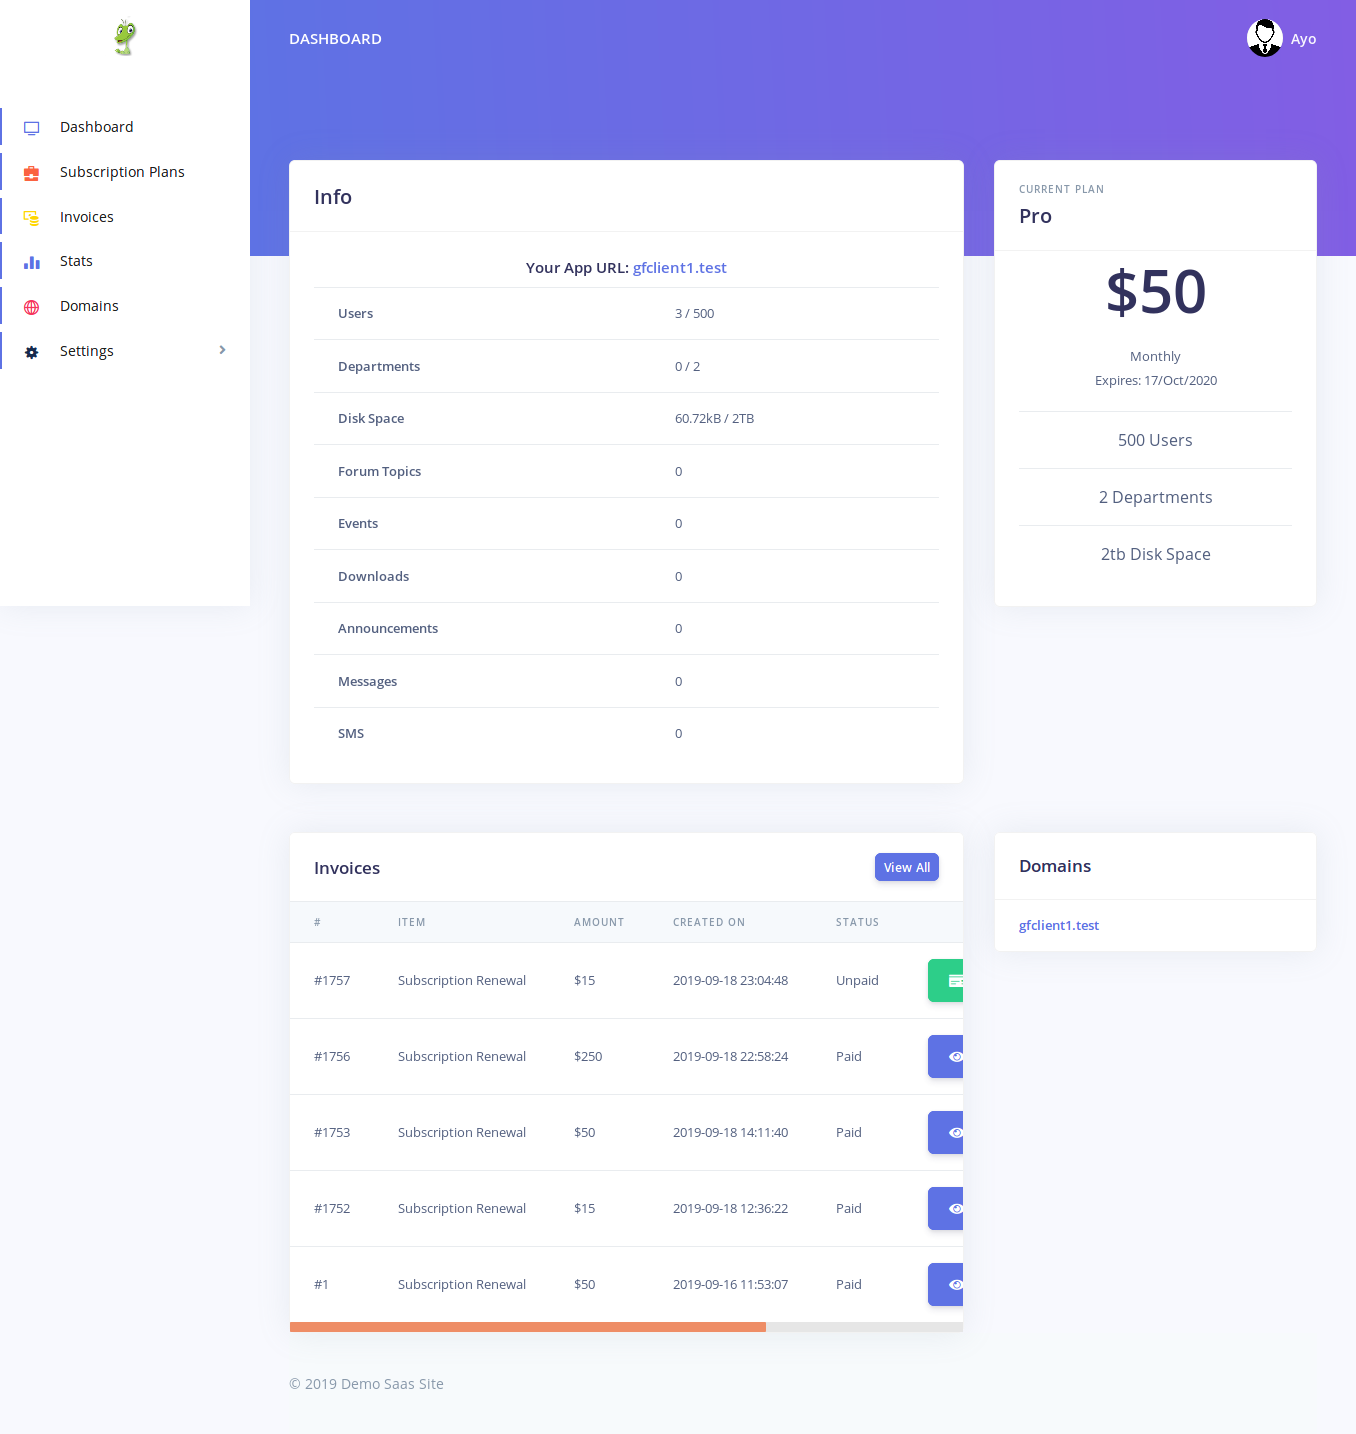
Please note that a user will only be directed to the dashboard if they completed the setup form during registration.
If a user did not complete the setup wizard, they will be redirected back to the wizard after they login.
The dashboard contains different information about the user's subscription. It shows them their current plan and also their most recent invoices.
In this section, we are going to cover all the configuration options available on the application
Administration Settings
When logged in as an Administrator, you will see a 'Settings' menu option at the bottom of the left hand side menu (on Desktop devices)
Under this menu, there are various options:
- General
- Free Trial
- Currencies
- Language
- Email Settings
- Mailchimp Settings
- Social Settings
- Logo/Icon
- Administrators
General
The General settings page enables you set basic information for the entire application such as the Site's name, the email used for notifications (Site Email) etc.
Some important settings here to note are
- Site Email: This is the email that the system 'Always' uses to send out emails.
- Enable Registration: This controls if users will be allowed to create new accounts on the site. You may wish to disable this if you only want Administrators to be responsible for creating new accounts
- Header Scripts: This is very useful in customizing the look of your application or adding widgets. Content you enter here will appear in the HEAD section of all the pages of the application. You can add things like css styles or javascript code
- Footer Scripts: Content you enter here will be placed before the closing BODY tag of all the pages of your application
- Disqus Shortcode: Gforce uses the Disqus (disqus.com) commenting system for comments on the blog and documentation pages. Save your Shortcode here in order to enable comments. You can get your shortcode from the Disqus website.
Free Trial
Gforce enables you setup a free trial for new users. This page enables you configure it.
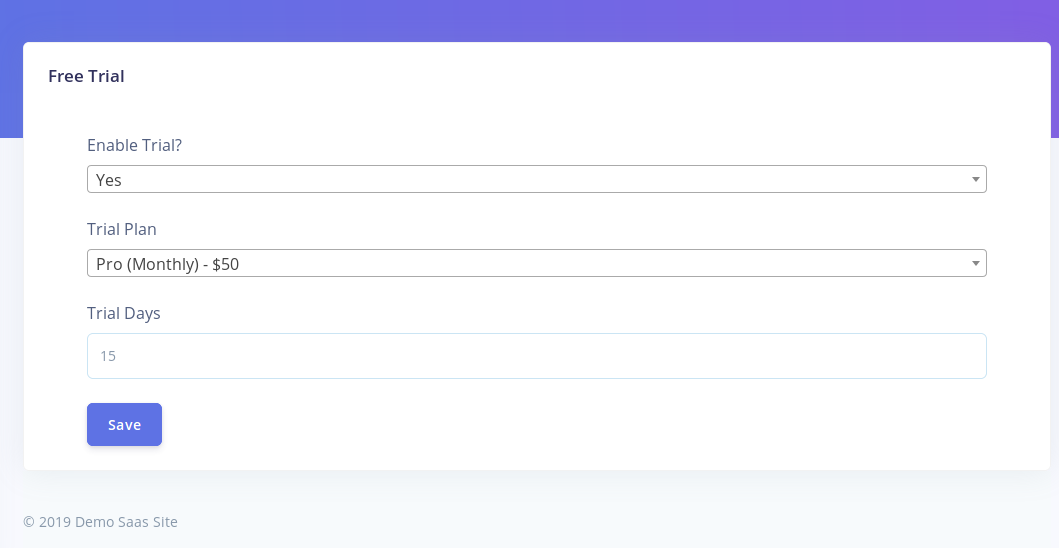
- Enable Trial?: set if free trial is enabled or not
- Trial Plan: Set the default plan that subscribers will be assigned to once they start their trial
- Trial Days: Set the number of days that the free trial will be last for.
Currencies
The application supports multiple currencies. On this page, you can easily add new currencies and configure you existing currencies.
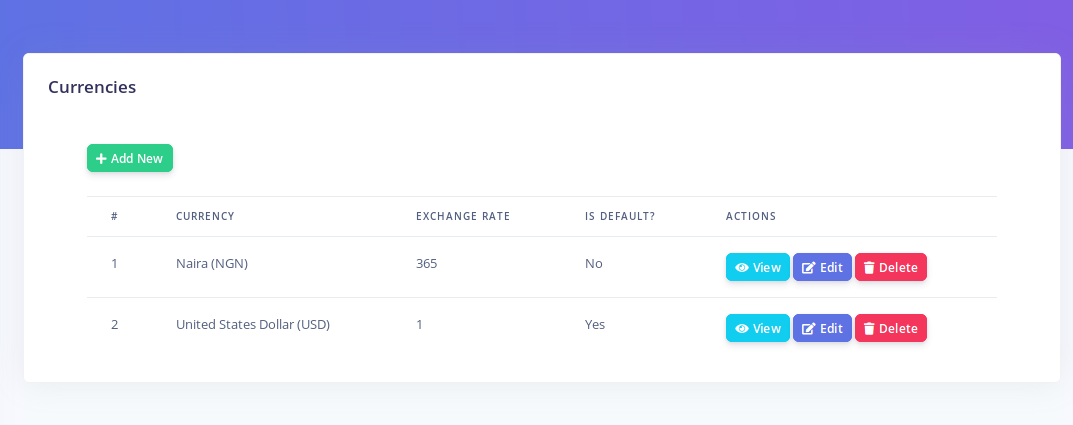
Each currency has the following values:
- Is Default: This determines if the currency is the default currency to be used by the system
- Exchange Rate: If this currency is not the default, then set its excahnge rate here relative to the default currency. The exchange rate is the value that will be multiplied by the amount to yeild the new currency.
Language
GForce supports 18 languages out of the box! On this page, you can change the entire language used in the user interface with the click of a button.
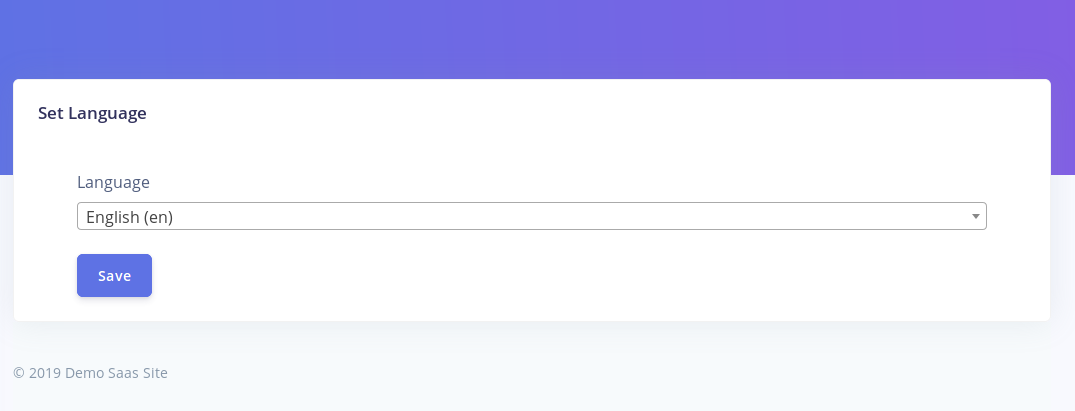
The dropdown control displays all the installed languages. If however you wish to install a language not listed in the dropdown, GForce makes that
very easy to do. Do note however that this is an advanced task.
Adding a new language
GForce uses Google's translation service to automatically generate new language files. Hence whatever language you are adding must be one of the over 100 languages the Google translate service supports.
To add a new language, open the following file config/auto-translate.php
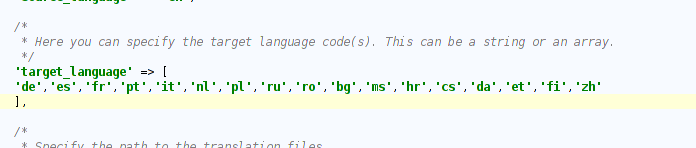
The 'target_language' array key lists all the currently installed languages using their standard two letter language codes. To add a new language, simply add a new array element to the list. Also, update the 'dict' array to include an entry for your language as a key=>value pair (code=>Name).
Once you have updated the lists, open your terminal to the root of the application. Run the following command:
php artisan autotrans:missing
This command will generate your new language files. Please make sure you have an active internet connection before you do this.
Once the command has run successfully, You will now see your new language listed as an available language.
MailChimp Settings
You can integrate the Gforce newsletter signup form (available on the footer of all public site pages) with
MailChimp.
On this page, you need to set your Mailchimp Api Key and the list id of the mailing list you wish to subscribe users to.
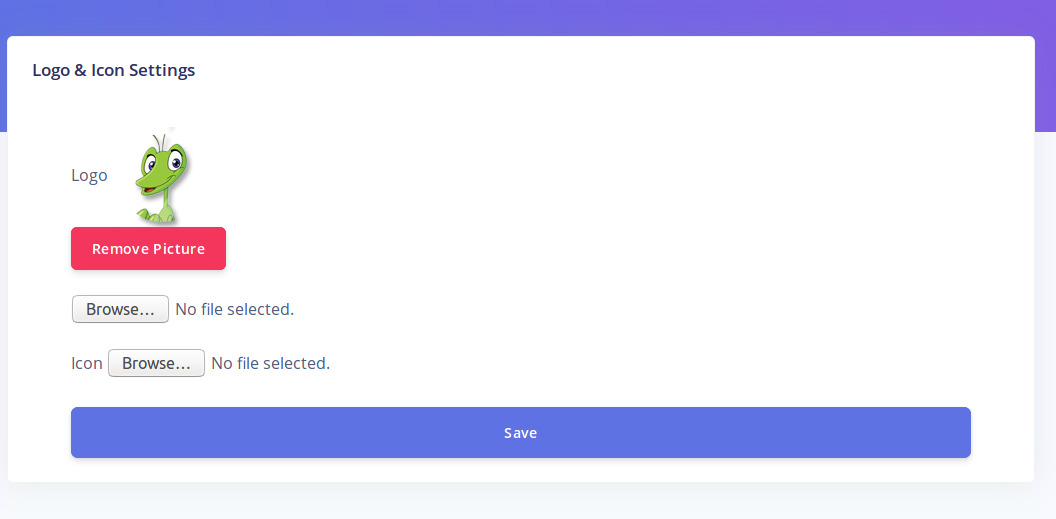
Logo/Icon
This section enables you update the Main Site Logo and the Browser Tab icon (Favicon).
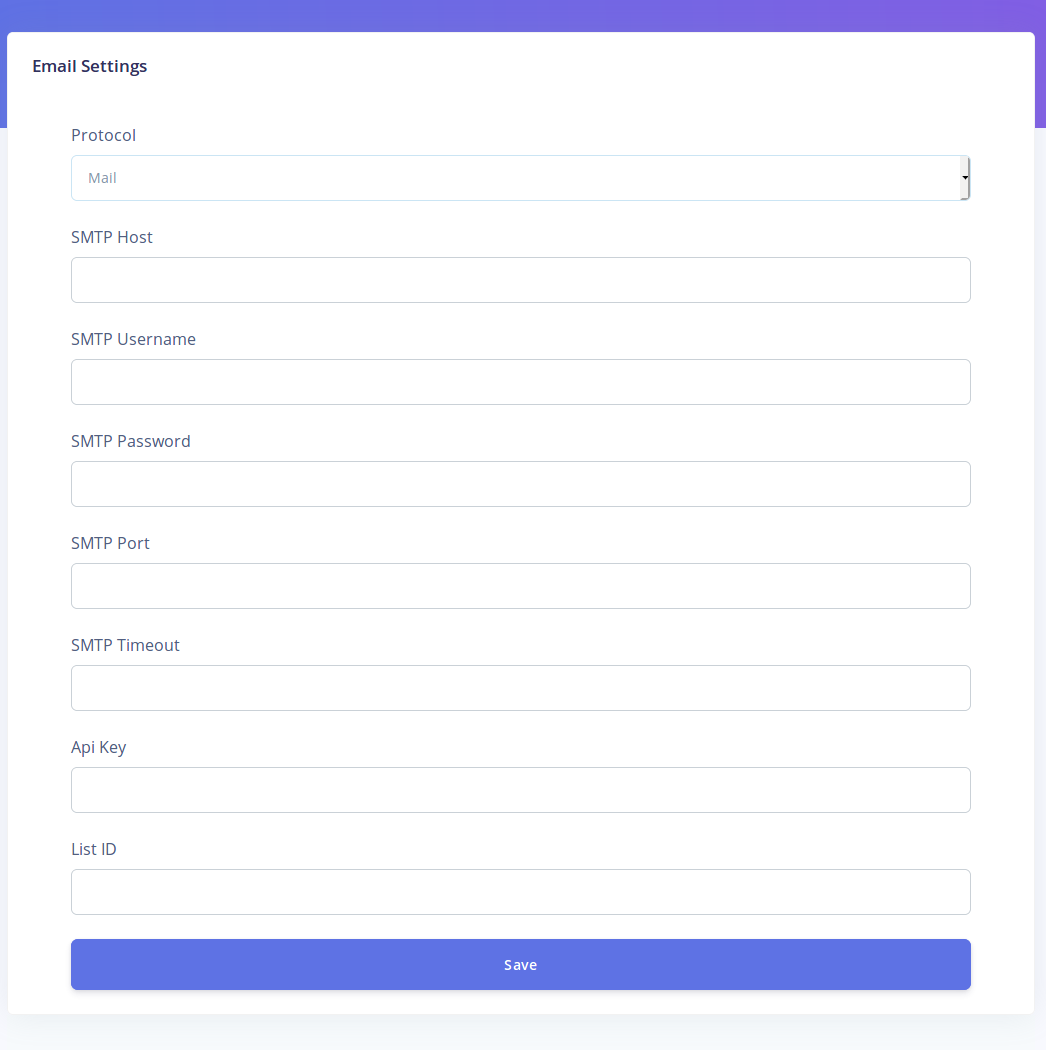
Email Settings
GForce enables you configure the way email is sent directly from the setting section. You can choose either the 'Mail' option or 'SMTP'.
If you choose to use the 'Mail' option, the application will send email directly through php (or whatever method you set in your .env file if you modify it). If however you
choose the SMTP option, the system will only send mail via SMTP using the credentials you supply.
Social Settings
Set your links to your social media pages here. Please set the full url e.g https://facebook.com/yourpage . The social links are displayed on the footer of all the site's public pages.
Administrators
The Administrators page shows a list of all Administrator accounts on the system. You can create additional accounts here and modify existing ones.
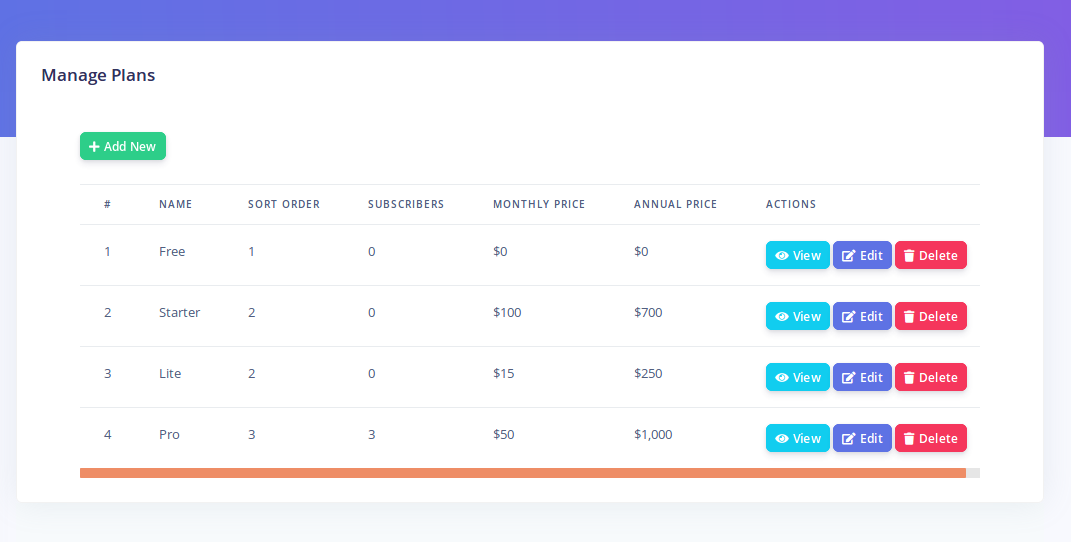
You can create as many subscription plans on the application. Each plan can have a monthly and annual price.
You can set the various limits available for each plan.
Creating a plan
Click on 'Plans'-'Create Plan'. The following page will appear:
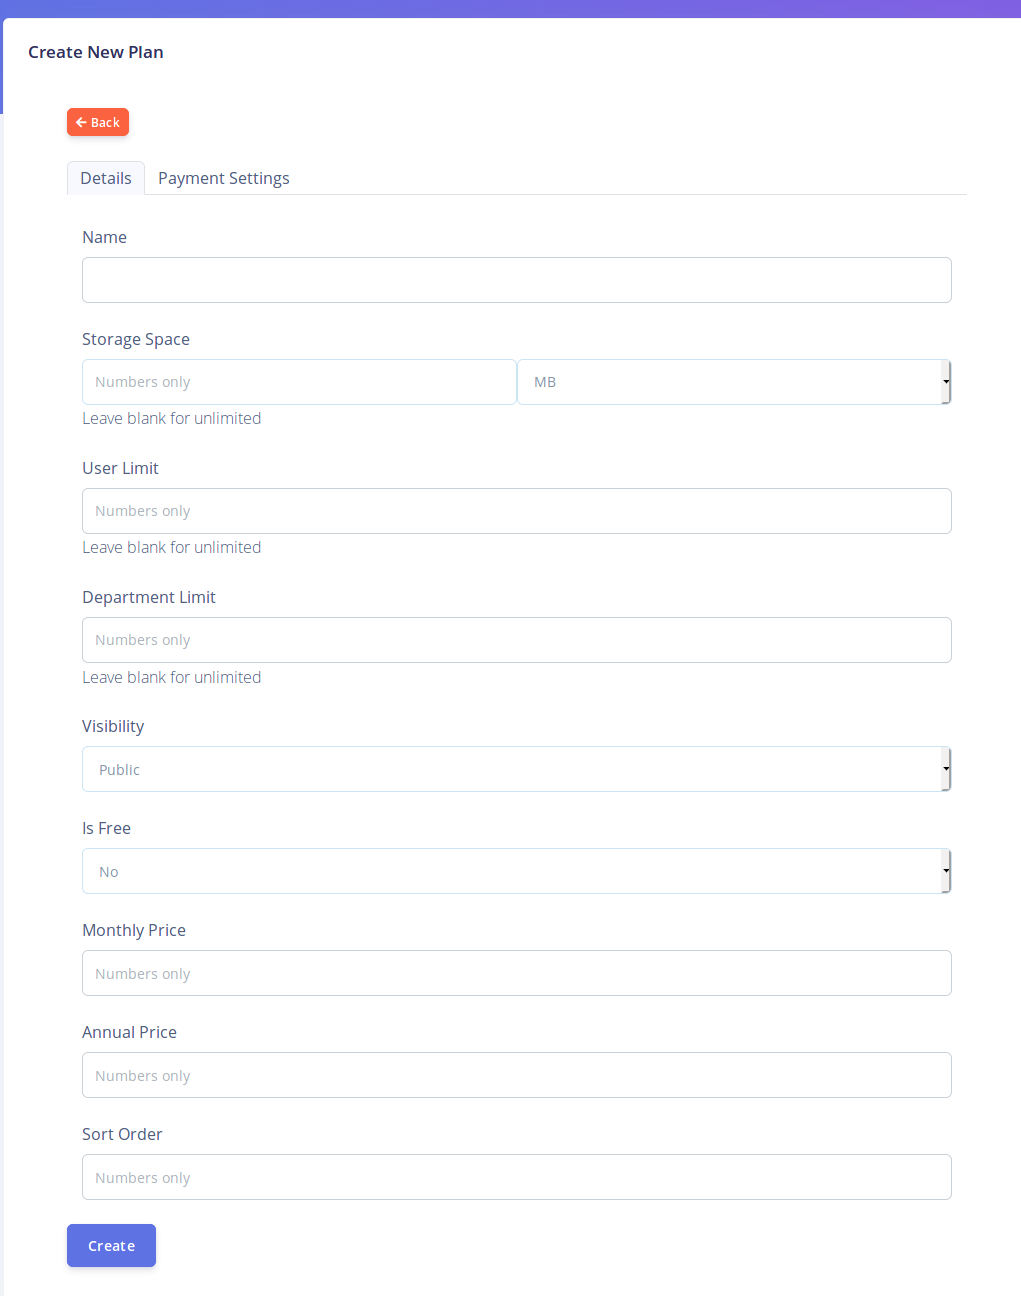
You will see two tabs on this page. 'Details' and 'Payment Settings'. Under the
details tab, you get to set the main options for this plan
- Name: Give the plan a name e.g Pro . This is the name display for subscribers
- Storage Space: Specify how much disk space users are allowed to use. The system will prevent users from uploading more files once they reach or exceed this limit. Leave blank for unlimited
- User Limit: Specify the maximum amount of user accounts (either admin or members) that this plan will allow. Users will not be able to create new accounts (or registrations) once this limit is reached or exceeded. Leave blank for unlimited
- Department Limit: Specify the maximum number of departments this plan will allow. Leave blank for unlimited.
- Visibility: This controls if the plan should be visible on the public site or not. You can create private plans if you wish to place some subscribers on custom plans.
- Is Free: Specify if this plan is a free or paid plan.
- Monthly & Annual Price: If the plan is not free, these fields will be available. Set the prices here.
- Sort Order: This controls the order in which plans are displayed on the public site (in ascending order)
Under the 'Payment Settings' tab, you get to setup the Stripe payment gateway plans that correspond to this plant's annual and monthly prices. You can skip this if you are
not using stripe.
Also visible on this tab are the webhooks for both Stripe and Paypal. It is CRUCIAL that you set these webhooks in their
corresponding gateways if you are using any of these gateways. Failure to do so will prevent your subscriber's invoices from getting approved after payment.
The subscribers section allows you to manage all the subscribers on your application.
You can also add a new member here and add them to a plan.
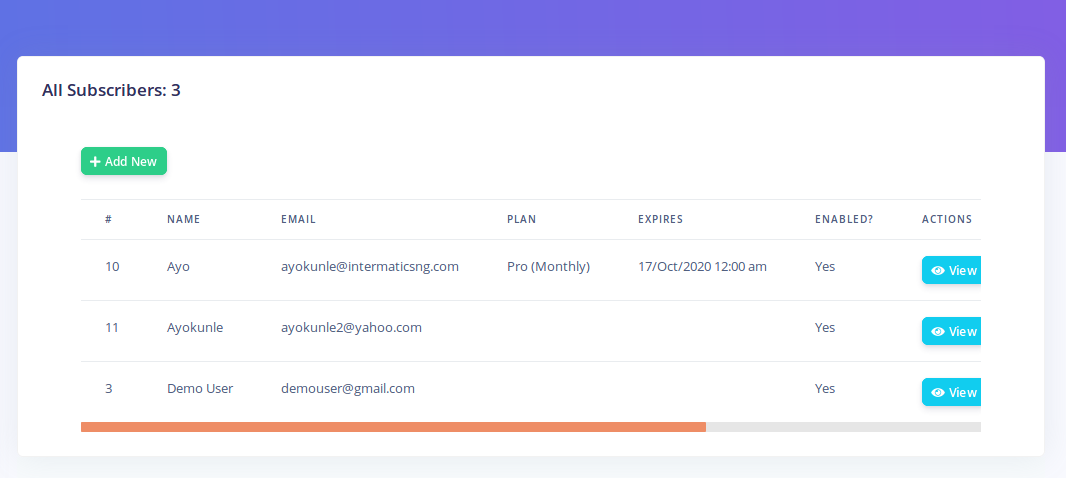
Click on 'Add New' to create a new subscriber. Most fields here are self explanatory. However, take note of:
- Trial: If you set the user as a trial, then they will be created on trial basis. Their trial will expire based on your free trial settings. If you set Trial to 'No', then they will be created as a regular user and their initial subscription will expire based on the plan you created them on
- Site Name: This is going to be the name of the subscriber's site. Its usually their organization name
Modifying Subscribers
You can make changes to a user's account by clickin on the 'Edit' button. On the edit page, you will see an 'Expires' field that brings up a date picker. This field can be used to set the expiration date of a subscriber's current subscription. This is useful should you need to manually extend or reduce a user's subscription.
A note about the 'Enabled' option: If set to 'No' then the subscriber will not be able to login. Also, their portal will be listed as unavailable.
Domains
On the Subscriber list page, if a subscriber has completed the setup wizard (or you created them yourself), you should see a 'Manage Domains' option for each subscriber.
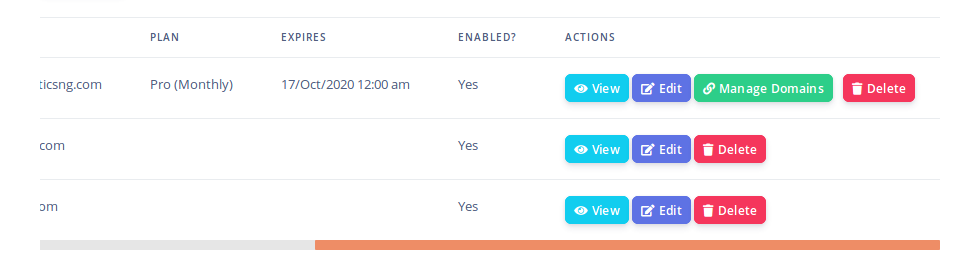
Clicking this button will lead to a page where you can see the list of all domains associated with a subscriber. A subscriber can have multiple domains associated with their account.
However, from the subscriber's account area (when they login), they can only modify the first default domain name (the subdomain) created for them. If they wish to use a regular domain name or multiple subdomains, you can set it up for them here.
Out of the box, Gforce comes with three payment methods that you can setup for your site:
- Paypal
- Stripe
- Bank Transfer
Clicking the 'Payment Methods' menu option, displays all the available methods
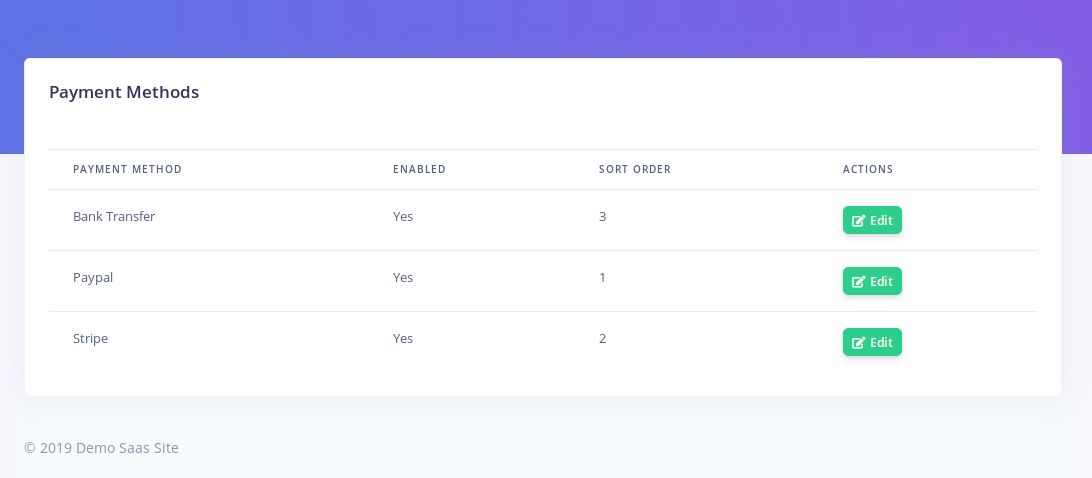
The enabled column indicates if the method is live on the site or not. The sort order indicates the position the payment method will be displayed relative to others (in ascending order).
Click 'Edit' to modify a method
On the payment method edit page, take note of the following:
- Label: This is the name of the payment method that will be displayed to the subscriber during checkout. For example you may wish to rename 'Stripe' to 'Credit Card - Mastercard/Visa' etc
- Enabled: Sets if the method should be available on the site
- Global: If set to 'Yes' then this payment method will be available to users regardless of the currency they select
- Currencies: Specify the currencies or currency that this payment method should work with based on your installed currencies.
Notes on Stripe Gateway
In order to use Stripe, you will need to first create all your plans on the stripe website to correspond to the name and price of your plans created on the application.
It is the plan that you configure on the Stripe site that subscribers will pay so make sure it tallies with what is on the site in order to prevent confusion. The currency the customers will pay in on Stripe depend on the setting on the Stripe site so if they select a different currency during checkout, it will have no effect during
actual payment.
Also ensure that you set your webhook on the Stripe site. The webhook is of the form yourdomain.com/webhooks/stripe See the 'Managing Plans' section for more information.
Nots on Paypal Gateway
Payments via paypal will use Paypal's subscription billing system. The currency selected during checkout on Gforce will be passed on to paypal in order to enable the susbscriber pay in their preferred currency. Hence ensure that the currencies you set for paypal here are actuall currencies that paypal supports.
It is also crucial that you setup your webhook on Paypal. The url is of the form: yourdomain.com/webhooks/paypal . This is necessarry for auto renewal of subscriptions.
In the Invoices section, you can see all invoices generated by users or automatically.
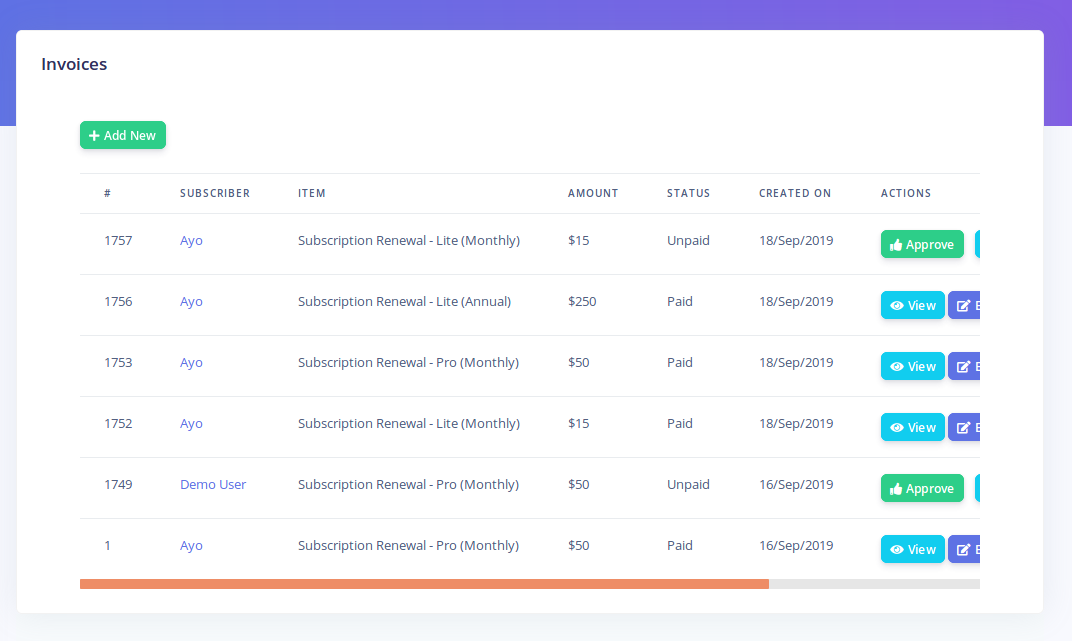
You can also create invoices here. Clicking 'Approve' for an invoice will automatically renew the subscriber's subscription
Notes on plan changes
If an invoice is approved for a subscriber on the current plan they are on, then their plan will be extended i.e if their subscription has not expired, they will simply be extended so they do not loose any remaining days. However, if the invoice is for
a different plan other than the plan the subscriber is currently on, then the subscription will start afresh from the date of the approval.
The features section helps you create and manage writeups that appear under the 'Features' menu option on the main site
The 'Menu Title' is the option that appears on the menu dropdown itself while the 'Page Title' is the title
that appears on the page itself when open.
The Sort order determines the position of the article on the menu in ascending order.
The Articles section allows you to create writeups that are linked to from the footer of all pages on the main site
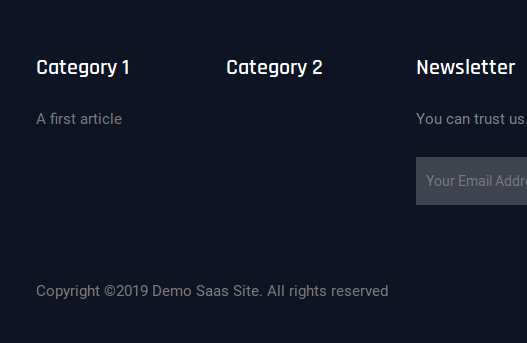
Articles are arranged on the footer based on categories. You can create multiple categories but we recommend 4 for display purphoses.
The Sort order determines the position of the article on the menu in ascending order.
The application comes with an easy to use Bloging feature that enables you create posts on the site.
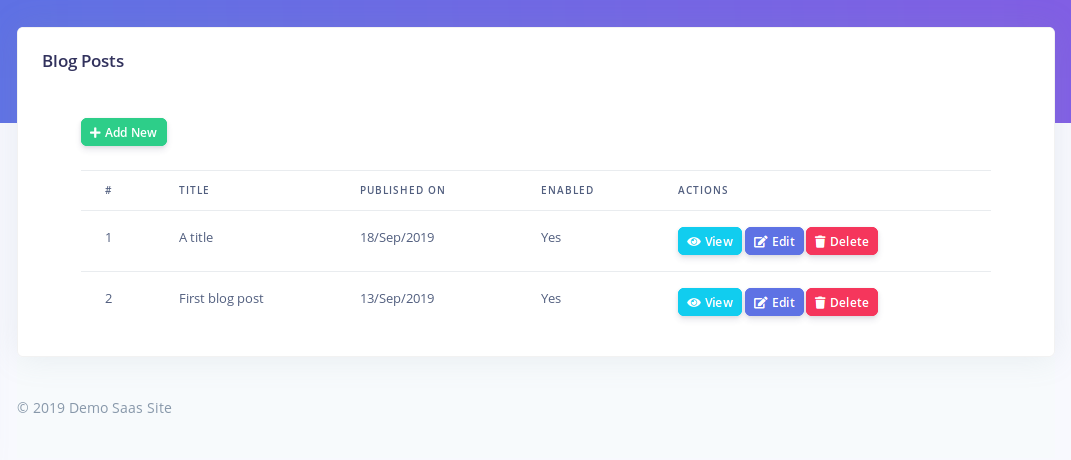
In order to enable comments on your blog posts, ensure you set your Disqus shortname as explained in the 'Settings' section.
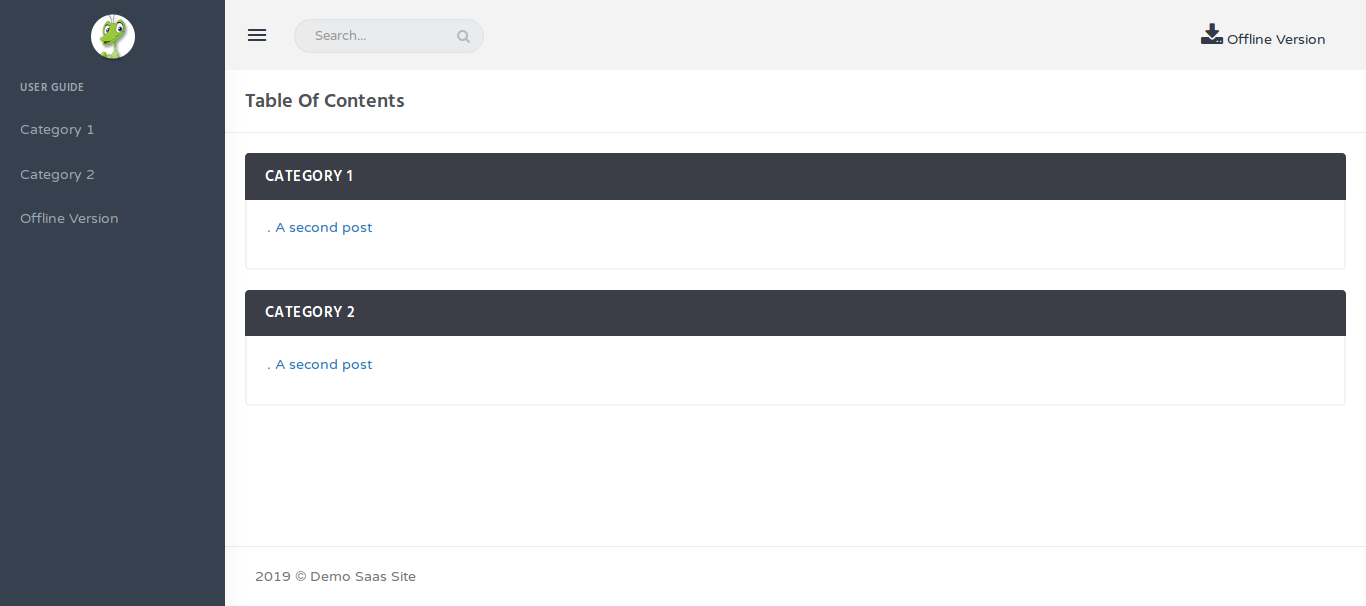
The documentation feature is an online user guide that your subscribers can consult to learn more about managing their application.
You can organize help articles based on categories.
It is important that you setup a cron job when you install Gforce. This will enable the application be able to send out notification
to subscribers. It will also trigger the cron jobs for each active subscriber.
To setup your cron job, add this cron command to your server
* * * * * cd /path-to-your-project && php artisan schedule:run >> /dev/null 2>&1
Upgrading GForce is straighforward. First you need to backup the entire system. Next, copy the public/uploads and public/saas_uploads folder to a separate location.
Also copy the .env file (in the root directory) to a safe location. Then replace the application's files with the new files you downloaded.
Once you have done this, place back your .env file back to the root directory. Also copy your public/uploads and public/saas_uploads directory back.
Finally, open your terminal and run the following commmands:
php artisan migrate
php artisan tenancy:migrate